Lincoln Continental Mark V Passenger Side Dash/vent Panel Restoration Kit on 2040-parts.com
Menasha, Wisconsin, United States
|
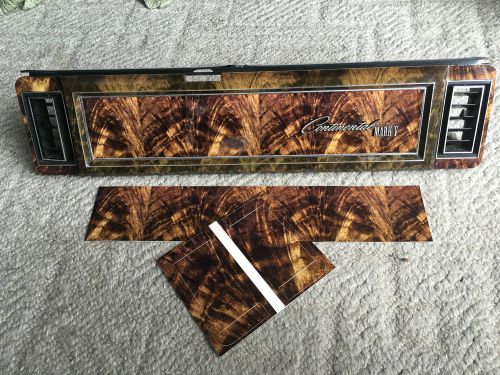
This listing is for the two sheets of high quality 3M vinyl restoration decals for the 1977 - 1979 Lincoln Mark V passenger side dash panel, located above the glove box. The dash/vent panel in the upper half of the first picture is shown for reference only, a completed assembly using this kit. It is not included. Follow these instructions for excellent results in repairing your damaged or worn, flaking, panel. 1. Remove the 3 fasteners holding the "Continental Mark V" emblem in place. Lift a side with a very small flat screwdriver or similar, to create a lip that can be grabbed with a pliers. Turn while lifting to get it to thread off of the posts. 2. Push the posts from the back side to get the emblem started off the panel, pull it off carefully working evenly across the length. 3. There are two options for applying the decals; I've used both and they both work well. Just depends on the condition of your starting piece and personal preference. First option is to scrape, peel, sand, ...whatever is necessary to create a perfectly smooth surface in the large center rectangle. The woodgrain printed decal once removed from the backing is very thin, and any bumps, significant scratches, any real imperfection will appear once the decal is in place. Smooth as possible is important! I have even used primer, then sanded down as needed. Then peel and apply the decal slowly, working out any air bubbles as you go. A second option may be easier, especially if working with a very rough part with flaking, etc. Less attention can be paid to getting the panel surface perfectly smooth if you apply the decal to a separate thicker film material first, then apply that thicker, stiffer, composite result to your panel with your glue of choice. A trade-off is that now you have to trim to fit before gluing, but this method insures a nice smooth uniform appearance. A twist to this option if you prefer is to carefully scuff the backing material of the decal as it comes (it is very thin also, don't go through it) using sand paper. Then apply glue directly to that scuffed back side to apply the decal without ever peeling it. I'm sure there are many other options! The key is a smooth surface under the decal, or you will see the flaws. 4. For the ear pieces around the vents, if they are rough and ugly looking, they can be removed completely from the plastic base backing with a razor blade. A little heat will help if it's stubborn but I've had most peel off easily once started. You'll then need to remove the glue residue and get the surface smooth again. If they're in good shape already, you may opt to leave them as is, or if you want the color to match the center section, just scuff the original surface lightly before peeling and applying the decal directly over the original. 5. Put your emblem back on and enjoy a long lasting fix to a very common problem with the Mark V's. The material is a 3M vinyl that is used mainly
for exterior automotive wraps. It is designed to be UV-fade
resistant, durable, and flexible; able to follow most any shape. It has a
bit of elastic capability before distorting that makes it easy to fit exactly
to flat or contoured surfaces. It also has just the right amount of
light reflection. I trialed several different materials and this one is
excellent for the application. Top 10 observations and suggestions that apply
to installing each of the available kits onto a variety of surfaces: 1. It is very important to have your
starting surface be as smooth as possible. The vinyl is thin enough to
reveal any specs, scratches, etc. Hand sanding is usually fine for most
pieces. For deep scratches, other damage, molding depressions (sometimes
on the steering wheel horn pad bases), to get a very smooth surface consider
using a primer/filler material, then sanding down, repeating as needed.
2. Also make sure your surface is very clean; no sand left over and no
fingerprints, etc. I use rubbing alcohol on a folded paper towel
and it works great on all surfaces.
3. One your surface is ready, place the decal as-is (un-peeled) in exactly
the location in needs to be on your part. Makes sure edges line up
nicely, any cutouts are all aligned to cutouts in the decal, etc. Then
tape one end of the decal securely in place so that it won’t slip, staying
exactly in its final location. I use black electrical tape, it
holds in place and then releases well.
4. Lift the un-taped side of the decal and peel about half of the white
backing material away from the sticky decal, and carefully cut away the lifted
section of backing. Do not attempt to tear the backing with your fingers;
you’ll leave residue on the decal’s adhesive that will be very difficult to get
off. Use scissors.
5. Lower the exposed portion of the decal into position pressing into
place with your fingers starting at the cut-line you’ve just made and working
outward toward the edges of the part. Use enough downward pressure
and go slowly to get out any wrinkles or air bubbles. You might use a
plastic straight edge for larger surfaces like the Mark V passenger side dash
panel, to squeegee out the decal evenly.
6. Remove the tape pulling parallel across the surface gently, not lifting
upward off the part, and repeat the process for the remaining portion. Remove
the rest of the backing and again work from center outward.
7. You can pull on the material just a bit without distorting it if
necessary to get all edges to land exactly where they should. The decals
are cut precisely for fit where applicable, but there are always slight
variations and going slowly and carefully will get a great result. 8. If
something does go wrong; the decal touches a part it shouldn’t, gets a
wrinkle or bubble while applying…in any case where you must lift the exposed
decal from some surface, try to do so with small, firm, quick, jerk-like
motion. This will reduce chances of permanently deforming the
decal. Try to avoid grabbing an edge and pulling harder, then harder
until it starts to release – this will likely cause too much stretch. 9. If
in worst case you do stretch the decal beyond a border of some kind, it is easy
to trim with an exacto knife, razor blade, or similar once all is firmly in
place. 10. Feel free to contact me any time with questions. I will also
consider doing the installation work for you if you prefer. More kits are available specifically for the Lincoln Mark V; driver's instrument cluster cover, left and right seat/window switch housings, ashtray lids. There are also similar kits available for the Continental / Town Coupe / Town Car vehicles. Please check out my other similar listings; I always combine parts for best shipping cost. Thanks! Perry 920-205-1295 |
Trim for Sale
 1970 - 1981 pontiac trans am firebird camaro seat track trim cover oem 3063230(US $6.00)
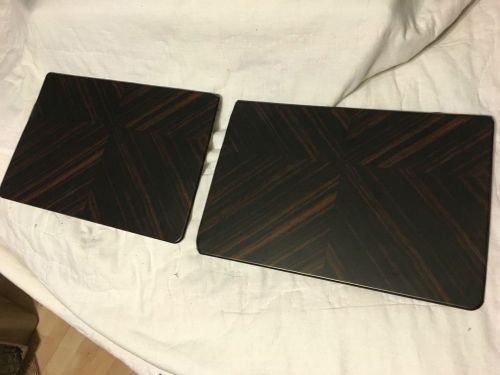 1978-79 lincoln mark v diamond jubilee/collector's series map pocket panels
 1970 71 ford torino gt cobra fastback sportsroof interior trim black left(US $25.00)
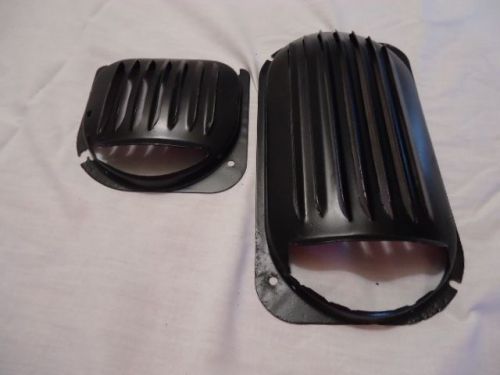 1959 ford truck panel delivery f100 heater floor vents trim
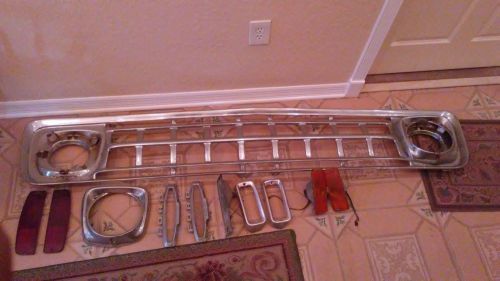 1964 ford f-150 parts
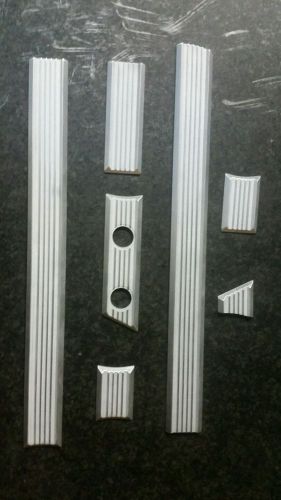 Karman ghia dash trim set 1966 rhd(US $185.00)
GM moves Korean design studio to Seoul
Tue, 20 Apr 2010General Motors is moving its Korean advanced design studio from Incheon to the trendy Gangnam district of Seoul. The studio, one of 10 design studios worldwide for GM, employs 30 designers. It has prime responsibility for GM's small cars, such as the Chevrolet Aveo, Spark and Cruze.
Project Car Hell, Rock-and-Stick-Simple Off-Road Trucks Edition: Land Rover or Scout?
Mon, 26 May 2014Last week, the Hell Garage Demons went back 100 years for a couple of challenging centenarian projects, and the temperature of the Automotive Lake of Fire—conveniently located between the junkyard that always closes five minutes before you show up and the parts store whose counter guys have never heard of your make of car—accordingly rose another few hundred degrees. This week, we've decided to go with the kind of vehicles you'll want when society collapses and "rugged individualists" will need to drive many miles down a road of skulls and broken whiskey bottles to barter rat pelts for handy Clovis points. That's right, simple off-road trucks with few moving parts and a heritage of simplicity—none of this complicated computerized crap, modern alloys and independent suspension (at either end) here, just a steel box with enough running gear to make it move.
Think City EV Cup Edition (2010) first official pictures
Wed, 30 Jun 2010Manufacturers have been trying to make their racers more economical for some time now; Audi and Peugeot have produced diesel Le Mans winners and CAR reviewed the Porsche GT3 R Hybrid in the June 2010 issue, but this the most recent fully electric offering from Norwegian company Think. Think has followed the traditional road-racer conversion for this one-off prototype, by stripping out most of the interior and space for the passenger, using Perspex instead of glass in the windows, installing a solitary lightweight bucket seat and lowering the centre of gravity. The company claims the diet reduces the Think's weight by nearly 70kg; that's the same saving as a Lamborghini Gallardo Superlegerra, remember.