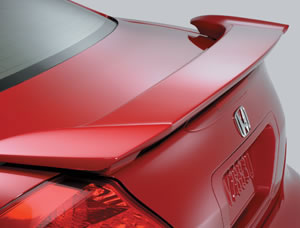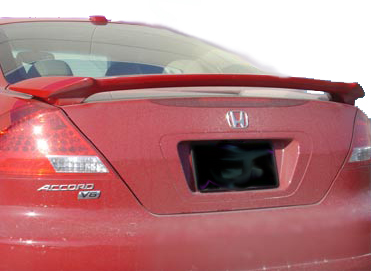
HONDA ACCORD 2DR FACTORY STYLE SPOILER 2006-2007
Brand New Factory Style Spoiler for 2006-2007 Honda Accord. This spoiler comes painted to match your car. Spoiler is painted with Dupont factory matched OEM paint and comes with a 3 year warranty. Please select your paint code from below and note the paint code when ordering. Please email any questions. See picture for more details.
Installtion Video Included
THE COLORS WE HAVE AVAILABLE ARE:
NH658P Graphite Pearl
B92P Nighthawk Black
R94 San Marino Red
B517P Sapphire Blue
NH578 White
NH700M Alabaster Silver
YR538 Desert Mist Metallic
Made from Blow-Molded ABS
Lightweight and won't crack like fiberglass
Mounting hardware, installation instructions, and template included.
We ship to Alaska, Hawaii, Canada, Puerto Rico, and Puerto Rico. Please choose International Shipping Charge of $50 when making payment.
Bolt-On Application STEP-by-STEP
STEP 1.
After opening and inspecting your rear spoiler you can begin the installation. Notice that the LED light and the pedestal gaskets come pre-installed from the factory (pre-painted spoilers only), which will shave some time off the installation.
STEP 2.
Start out by turning over the spoiler and setting it on a soft surface, to prevent any scratches. Place the plastic locator T-strips into the mounting holes on spoiler and LED brake light hole. TIP: A small piece of masking tape is helpful in holding the T-strips in position.
STEP 3.
Place spoiler on closed decklid and align to proper position. A measuring tape will ensure a "perfect" alignment.
STEP 4.
Using masking tape, secure locator T-strips to the decklid of the vehicle. Simply remove the spoiler by lifting straight up leaving the T-strips secured to the decklid.
STEP 5.
Using a 1/8" drill bit, drill thru the T-strip holes and into the decklid. It is not necessary to drill through a double panel on this particular application because we can utilize the factory openings on the underside.
STEP 6.
Remove T-strips and using a 5/16" drill bit, drill thru the 1/8" hole in step 5. If a "double panel" does exist, use a 3/4" drill bit to drill thru the "inner panel". This allows the ratchet or nutdriver to secure the screw tightly against the upper panel.
STEP 7.
After deburring all holes, apply small amounts of primer which will help prevent rusting of the freshly drilled metal.
STEP 8.
Pull back pedestal gaskets exposing mounting tape and place spoiler on decklid and using supplied screws secure to the vehicle using a ratchet or nutdriver. Be sure to feed the LED light wire through the pre-determined hole. Apply small amounts of silicone based caulk over mounting screws as this will help prevent leaking, rusting, or loosening of screws. TIP: Gasket material is extremely sticky once exposed, so we found that spraying it with water or glass cleaner will allow you to reposition spoiler as needed.
STEP 9.
When installing a LED brake light it is recommended to splice into the 3rd brake light in the vehicle and attach spoiler wires using electrical tape. Step on the brake light to ensure proper wiring, simply switch the two connections if spoiler does not light.
STEP 10.
Finish your install by vacuuming any debris or metal shavings and then reinstall any panels, mats or other items that may have removed earlier in installation.
|