Audiovox Keyless Remote Entry Clicker Control Responder Transmitter Elvntrca on 2040-parts.com
Austin, Texas, US


THIS ITEM IS PRE-OWNED – IT WILL WORK LIKE NEW ONCE PROGRAMMED TO YOUR VEHICLE
ONE (1) PRE-OWNED
AFTERMARKET REMOTE KEYLESS ENTRY FOB ALARM TRANSMITTER CONTROL CLICKER KEYFOB CONTROLLER LCD 2-WAY PAGER
FUNCTIONS AT 100% TESTED & GUARANTEED
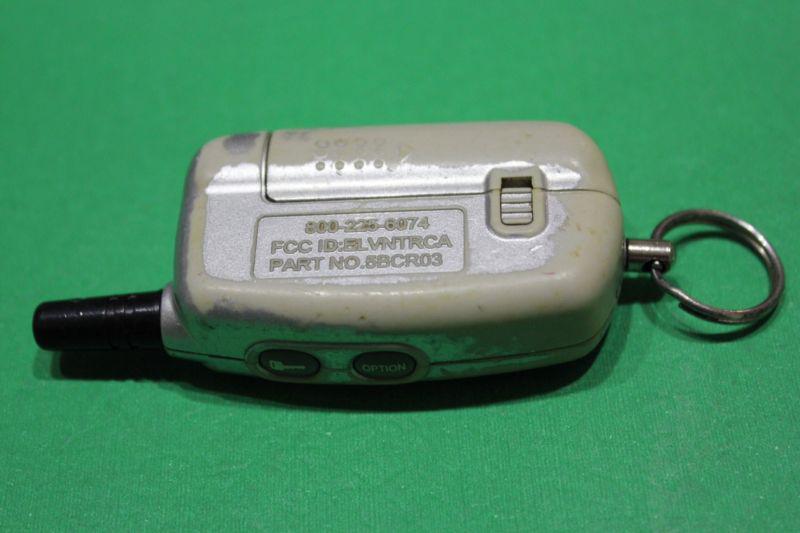
REMOTE’S LCD SCREEN IS LIGHTLY SCRATCHED AND THE CASE HAS SOME WEAR TO IT SEE PICTURES FOR MORE DETAILS REMOTE IS 100% FULLY FUNCTIONAL |
AUDIOVOX / PRESTIGE /CODE ALARM
FCC ID: ELVNTRCA
Interchangeable FCC IDs:
PART #: 5BCR03B
Interchangeable PART #s:
5 BUTTONS (3 ON FRONT & 2 ON SIDE)
FREQUENCY: 433 MHz
|
[ LOCK UNLOCK TRUNK START AUTO START AUTOSTART OPTION ]
[ 2-WAY TWO-WAY 2WAY ]
COMPATIBLE W/ THE FOLLOWING SYSTEMS:
| ||
APS590
APS596
APS597
APS905
APS996A
APS996C
APS997
APS998
DOESN’T WORK WITH APS996
|
PRO900
PRO9800
PRO9801
PRO9900
APS55TWT
APS590TWC
| CODE ALARM SYSTEMS:
CA135 CA-135
CA145 CA-145
CA160 CA-160
CA545 CA-545
CA645 CA-645
CA670 CA-670
CA671 CA-671
CA670A CA-670A
|
PROGRAMMING INSTRUCTIONS:
The following indicates the receiver programmable slots: 1 Lock/Unlock or Lock 2 Unlock if Programmed 3 Trunk Release & or Remote Start (Optional on some models) 4 Auxiliary Output 5 Auxiliary Output 6 Driver 1 Priority or Sperate Output 7 Driver 2 Priority or Separate Output Receiver channels 6 or 7 will accept the programming of transmitter channel 1 if used as the Lock/Unlock button, or Channel 2 when separate Lock Unlock buttons are programmed. In this way, whenever the transmitter is used to unlock the vehicle, channel 6 or 7, when programmed, will provide a pulsed ground output. This output can be connecter to the driver priority function of the vehicle to reset preset user features. Please consult with your installation centers technician to see if this feature is available in your vehicle. NOTE: A total of 4 transmitters may be programmed into any receiver channel! Force programming a transmitter, removing a transmitter, or reprioritizing a transmitter is covered later in this manual. Also, if you do not program a transmitter button into channel 2 which is the separate unlock/disarm channel, then whatever button is programmed into channel 1 will serve as both lock/arm & unlock/disarm. NOTE: The Option Button is predetermined and programmed for access to Time Start, and Temperature Start & Check so it cannot be used for multiple button operation of any other feature. It will however operate for any single button programming. TO ENTER THE PROGRAM MODE: 1. Turn the ignition switch to the “ON” position. 2. Within 10 seconds, Press and release the valet/program switch three times. (Siren emits 1 short chirp indicating channel 1 has been entered) 3. Within 10 Seconds, Press and hold the button of the first transmitter you wish to control the Lock & Arm feature of your security system until a long chirp is heard from the siren. (Repeat this for each transmitter you wish to operate the Lock/Arm feature). 4. Within 10 seconds, press and release the valet program switch one time. (Siren emits 2 short chirps indicating channel 2 has been entered) 5. Within 10 Seconds, Press and hold any unused button(s) of the first transmitter you wish to control the Unlock/Disarm feature of your security system until a long chirp is heard from the siren. NOTE: This channel is used only if you desire separate control of the Lock/Unlock feature. If you wish to operate the Lock/Unlock features from a single button, move onto step 6 as whatever button is programmed into channel 1 will control both Lock & Arm/Unlock & Disarm. (Repeat this for each transmitter you wish to operate the Unlock/Disarm feature). 6. Within 10 seconds, press and release the valet program switch one time. (Siren emits 3 short chirps indicating channel 3 has been entered) 7. Within 10 Seconds, Press and hold any unused button(s) of the first transmitter you wish to control Channel 3 output, (Trunk Release) until a long chirp is heard from the siren. (Repeat this for each transmitter you wish to operate the Channel 3 output (Trunk Release) 8. Within 10 seconds, press and release the valet program switch one time. (Siren emits 4 short chirps indicating channel 4 has been entered) 9. Within 10 Seconds, Press and hold any unused button(s) of the first transmitter you wish to control Channel 4 output, (Auxiliary Output 1) until a long chirp is heard from the siren. (Repeat this for each transmitter you wish to operate the Channel 4 output) 10. Within 10 seconds, press and release the valet program switch one time. (Siren emits 5 short chirps indicating channel 5 has been entered) 11. Within 10 Seconds, Press and hold any unused button(s) of the first transmitter you wish to control Channel 5 output, (Auxiliary Output 2) until a long chirp is heard from the siren. (Repeat this for each transmitter you wish to operate the Channel 5 output) 12. Within 10 seconds, press and release the valet program switch one time. (Siren emits 6 short chirps indicating channel 6 has been entered) 13. Within 10 Seconds, Press and hold the unlock button, (or any unused button(s)), of the first transmitter you wish to control Channel 6 output, (Driver Priority 1) until a long chirp is heard from the siren. (Repeat this for each transmitter you wish to operate the Channel 6 output, Driver Priority 1) 14. Within 10 seconds, press and release the valet program switch one time. (Siren emits 7 short chirps indicating channel 7 has been entered) 15 .Within 10 Seconds, Press and hold the unlock button (or any unused button(s)) of the first transmitter you wish to control Channel 7 output, (Driver Priority 2) until a long chirp is heard from the siren. (Repeat this for each transmitter you wish to operate the Channel 7 output, Driver Priority 2) NOTE: Channels 6 and 7 can be used as a separate output to control a function other than driver priority. Simply programming any unused transmitter button other than the unlock button will allow complete independent control of these outputs. ERASING TRANSMITTERS IF THEY HAVE BEEN LOST OR STOLEN: Before you begin to erase the lost or stolen transmitter(s), have all transmitters available that you wish to remain programmed. These will be used during the program process to identify transmitters that will continue to be used. ENTER THE TRANSMITTER PROGRAM MODE: 1. Turn the ignition switch to the “ON” position. 2. Within 10 seconds, press and release the valet/program switch three times. (Siren emits 1 short chirp indicating channel 1 has been entered) 3 .Within 10 Seconds, Press and hold the ARM or ARM/DISARM button of the first transmitter you wish to remain stored into the control unit until a single chirp is heard from the siren. (Repeat this for each transmitter you wish to remain stored in the control unit). The receiver stores up to four transmitters. To be certain all transmitter slots in the receiver are occupied with transmitters you wish to continue to use, and all others are erased, you will have to fill all four receiver slots. If in step 3 you identified one transmitter, you will have to fill the additional 3 slots. If in step 3 you identified two transmitters, you will have to fill the additional two slots, etc... 4. Press and hold any unused button or combination of buttons until a long chirp is heard from the siren. Release and press the button or button combination again and again until all remaining slots are full. Repeat this procedure with the appropriate transmitter buttons for all other receiver channels. REPRIORITIZING A TRANSMITTER’S PROGRAMMING: To reprogram a receiver channel with a different transmitter button once a code has been stored, there will be two options: 1. Enter the transmitter program mode of the receiver channel to be reprogrammed. Using any unused button or combination of buttons, push out the stored code by pressing the unused button until a long chirp is heard, then repeat 3 additional times. After this, you can add any desired unused transmitter button. This action erases only that particular receiver channel, all other codes will remain stored. 2. Enter the transmitter program mode. Using any transmitter button press and hold until a long chirp is heard. If a single chirp or multiple chirps, (up to 7 chirps), are heard, the unit is indicating that the transmitter has already been programmed elsewhere in the receiver. Release the transmitter button and within 5 seconds press and hold until a long chirp is heard. This action forces the unit to erase all stored codes of that transmitter. The unit then exits the program mode the siren emits the program mode exit chirp pattern. All transmitter buttons for that transmitter must now be reprogrammed. Any other transmitter stored in the unit’s memory still remains operational. If the button is released and not pressed again within the 5 second period, no change in programming has been made to the receiver channel. The programmer can move onto a different channel or erase the transmitter codes as described in 1 above. REPLACING THE BATTERY: You will notice a decrease in transmitter range as the battery condition deteriorates. There is also a low battery indicator that indicates no bars in the LCD panel, as shown below, when the battery begins to fail. Transmitter battery replacement is recommended at least every 6 to 8 months, depending upon how frequently the transmitter is used.
|
STOP!
BEFORE YOU BUY PLEASEREAD…
PROGRAM REMOTE TO YOUR VEHICLE
If you're not sure your vehicle can use this remote, please ask questions or contact your local dealer first.
THIS REMOTE NEEDS TO BE PROGRAMMED TO YOUR VEHICLE…
Keyless Entry Remote / Fob for Sale
 Mb chrome key(US $5.00)
 Land rover key fob(US $15.00)
 Brand new honda 3 buttons remote key shell without chip slot (US $5.89)
 Factory toyota smart key/key fob keyless entry/ alarm hyq14aab(US $36.00)
 Keyless remote 00 01 02 03 04 05 06 dodge neon p/n 04759008 gq43vt9t(US $14.95)
 2001-2004 dodge ram keyless remote control entry key fob original new(US $14.99)
Tesla Model S first EV to earn high praise from Consumer Reports
Thu, 09 May 2013Tesla Motors Inc.'s all-electric Model S sports car received the highest score in Consumer Reports' ratings -- a 99 out of 100 -- along with widespread plaudits from the magazine's automotive testing staff. The magazine said the $89,650 EV it tested "performed better, or just as well overall, as any other vehicle -- of any kind -- ever tested by Consumer Reports." The last vehicle to achieve a score of 99 in the magazine's testing was the Lexus LS 460L, which was tested in 2007. The Model S, which went on sale in 2012, also marks the first time any electric vehicle has earned a score that high, the magazine said Thursday.
VW Taigun: It’s an Up! SUV
Mon, 22 Oct 2012Volkswagen has revealed the VW Taigun at the Sao Paulo Motor Show in Brazil, a very compact SUV based on the VW Up! The Taigun is 3859mm long and 1728mm wide, making it a chunk smaller than the next VW SUV up (the Tiguan) and smaller even than Nissan’s Juke, but it gets an extra 50mm in the wheelbase compared to the Up so interior room looks decent. Vw say the Taigun is purposely designed to look just like a mini-me Tiguan or Touareg (and sound like one too) with its very similar styling, high ride height, skid plates and roof rails with an interior that offers room for four and enough spce for 280 litre of stuff in the boot (a plentiful 987 litres with the back seats folded).
The best retro fashion at 2013 Goodwood Revival
Mon, 16 Sep 2013Visitors to the 2013 Goodwood Revival made the show sparkle with a dazzling array of retro and vintage outfits. The motorsport show celebrates the cars of the post-war era when the Goodwood motor racing circuit was in its heyday - and punters flock to the show in clothes to suit. Please click on the image above to view the rest of the story

